Do not apply any impact force to Twistloc® fittings.
Twistloc® fittings are plastic materials and should not be treated the same as metals.
Twistloc® fittings may melt, crack or distort if exposed to open flames or excessive heat.
Do not use pipe sealant, thread sealants or Teflon® paste in order to seal threaded fittings. All the connections to Twistloc® fittings are either a mechanical compression type, or seal with a rubber gasket and do not require any other forms of sealant. Do not insert fingers into Twistloc® fittings as the stainless steel teeth may cause injury.
If PEX pipe is used, then a tube support liner must be used also. The tube support liner acts as an internal support for the end of the pipe.
Twistloc® fittings should not be used for gas, fuel oil or compressed air applications.
DO NOT allow contact with any chemical or foreign substance; paint stripers, solder flux, Acid based descalents or chemical.
Twistloc® fittings are not suitable for buried installation.
All Twistloc® fittings and related products should be selected, installed, used and maintained in accordance with these Technical Specifications.
When cutting pipe, ensure that the ends are cut square and are free of burrs.
Ensure that there are no scratches, gouges or any form of damage on the circumference of the pipe within 1 in. (25.4mm) of the cut end. Damage in this area may cause leakage. Check the fitting for any signs of damage or foreign objects.
Do not use a damaged or scored pipe.
* If the pipe is not fully inserted, the connection cannot be
properly sealed even if the fitting is coupled.
* If these installation guidelines conflict or are inconsistent
with local building or plumbing codes, any codes applicable
to parallel plumbing systems shall prevail.

Do not use a hacksaw to cut a pipe. Do not leave burrs on the pipe.
Ensure that the pipe is pushed into the fitting fully and is engaged
properly in accordance with Twistloc® instructions.
If the pipe is not fully inserted, the connection cannot be properly
sealed even the fitting is coupled.
You must push in the pipe passing the collets (gripper) and the
O-ring inside the fitting.
When a connection has to be disassembled and reused, ensure the
pipe has no damage around the circumference within 1" (25.4mm)
of the end. Inspect the tube and fitting for any signs of damage and
ensure they are free of foreign materials. The connection can then
be reassembled.
1
Cut the pipe squarely using plastic pipe cutting tool. Ensure the outside of the pipe is free from burrs and score marks.2
Measure and mark the insertion depth on the pipe using a suitable marker. Push fitting onto the end of the pipe until it reaches the pipe stop and insertion depth marking.| PIPE Size(OD) | 10mm | 15mm | 16mm | 20mm | 22mm | 28mm |
|---|---|---|---|---|---|---|
| Insertion Depth | 22mm | 30mm | 32mm | 36mm | 36mm | 41mm |
| PIPE Size(OD) | 1/4" | 3/8" | 1/2" | 5/8" | 7/8" | 1 1/8" |
| Insertion Depth | 20mm | 22mm | 27mm | 32mm | 37mm | 41mm |
3
Twist the screw cap until coloured ring is no longer visible. Only use hand force to twist the screw cap; using a wrench or other tools can easily damage the fitting and would not be covered by our guarantee. Pull the pipe away from the fitting to check it is a secure fit.4
To DISCONNECT: Make sure that the system is de-pressurised. Unlock fitting by twisting until coloured ring is visible. Press collect squarely against the face of the fitting. With the collet depressed, pull on the pipe to remove it from the fitting.
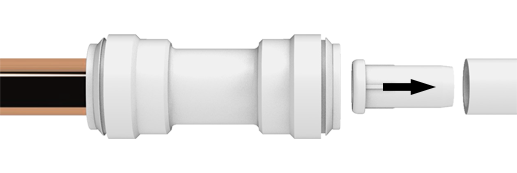
1
Cut the pipe squarely using plastic pipe cutting tool. Ensure the outside of the pipe is free from burrs and score marks.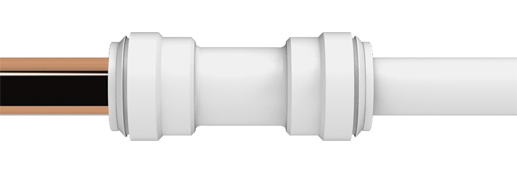
2
Measure and mark the insertion depth on the pipe using the table below and a suitable marker. Push fitting onto the end of the pipe until it reaches the pipe stop.| PIPE Size(OD) | 10mm | 15mm | 22mm | |
|---|---|---|---|---|
| Insertion Depth | 20mm | 28mm | 34mm | |
| PIPE Size(OD) | 1/4" | 3/8" | 1/2" | 5/8" |
| Insertion Depth | 17mm | 20mm | 24mm | 29mm |
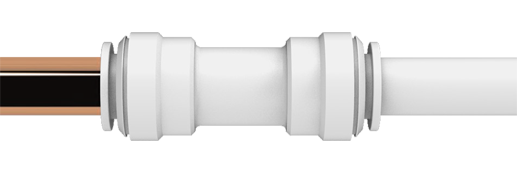
3
Pull the pipe away from the fitting to check it is a secure fit.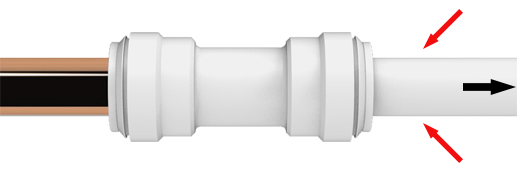
4
To disconnect: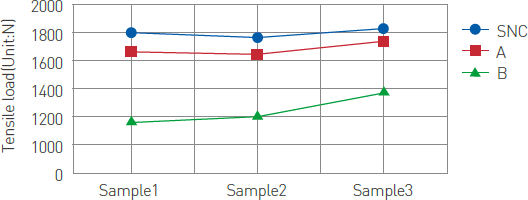
The graph above shows the results of a tensile strength test conducted independently by the Korean Government Laboratory and shows conclusive prove that Twistloc fittings outperform our competitors.
The Maximum torque values for threads used on Twistloc® products are as follows
| Thread | Size | Maximum torque |
|---|---|---|
| Plastic | 1/2″ | 3.5Nm |
| 3/4″ | 4Nm | |
| 1″ | 5Nm |
Twistloc® insist on rigorous testing to ensure that all of pipes and fittings are manufactured within certain tolerances.
As we are unable to guarantee those tolerances used by other manufacturers, we are unable to recommend our fittings be used with any other plastic pipe or fittings be used with ours.
If necessary, Twistloc® not only provides a permanent leak-prevention sealing effect but also enables immediate removal and system extension for re-work. In particular, this is a Push-in design for easy use.
The Stop End is also useful in system pressure testing prior to connection works.
Fully push in the pipe and pull to check it is secure. The release, depress the collet and pull out the pipe.
For maximum flexibility, Twistloc® fittings can be combined to provide multiple functions.

To maintain the pipe radius.
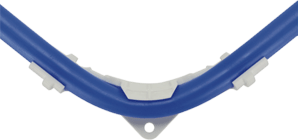
For sharp bends, standard elbow fittings can be used. For slight bends it is possible to use the flexibility of the pipe to produce a bend which can be clipped into shape, or tighter still with our cold forming bends, subject to the following limits.
| Pipe Size(OD) | 3/8" & 1/2" | 5/8" | ||
|---|---|---|---|---|
| 10mm & 12mm | 15mm & 16mm | |||
| Min Radius with Clips | 100mm | 175mm | ||
| Min Radius with Cold Forming Bend | 90mm | |||
Our collet clip is used with Twistloc® and Non-twistloc fittings to prevent accidental pipe disconnection and to provide color coding for the pipe.
Plastic pipes must be used with all installations and must be fully inserted. The Twistloc® insert is suitable for both PEX and PB pipes in common.
The Twistloc® pipe insert has been developed for use with barrier pipes and Twistloc® fittings to provide additional defenses when installing the Twistloc® push-fit system. The insert has its own O-ring which provides a secondary seal to the inside of the fitting with a stem sliding within the pipe inner diameter.
When installing the Twistloc® system in concrete and masonry, the pipe should be run in conduit pipe with access boxes for the fittings. This ensures that all pipe can be removed for replacement and maintenance, therefore complying with the requirements of the water regulations.
If Twistloc® fittings are installed in conduit pipes with access boxes for fittings, they can be laid in concrete and masonry. This is to extend the pipe and provide access to both pipes and fittings. As specified in Schedule 2.7 to the Water Regulations and BS8000: Part 15, the fittings and pipes shall be detachable for possible replacement. Insulation is also recommended to protect against heat loss and frost effects.
400 mm is the minimum distance for soldering to the copper pipe inserted into the Twistloc® fitting. Make sure that the residual flux and solder do not touch the fittings.
We offer a range of tank connectors in 15 and 22 options for connection to cold water storage tanks.
During installation, do not use any jointing compound on the connector. It should be tightened by hand as further mechanical tightening will damage the fitting.
A minimum length of 1 metre of copper pipe must be installed before connecting to a Twistloc® pipework system.
To avoid serious overheating, trapped air must be purged from the heating system before the boiler is operated. Always refer to the boiler manufacturer’s installation instructions in the first instance.
Plastic plumbing systems are not suitable for use on any continuously operated recirculating systems (secondary hot water circulation / ring main systems).
These installations differ greatly from traditional domestic installations and therefore Twistloc® pipe and fittings may not be used.
We wouldn’t recommend freezing techniques to carry out maintenance on our pipework or fittings. Ensure when installing the system there are suitable isolation valves used for maintenance purposes.
Our plastic pipe can be used in freezing conditions. However, to minimise potential failure, the below steps should be followed:
Twistloc® can be painted with either a water-based paint or an oil-based paint with an undercoat. Cellulose-based paints, paint strippers, thinners, flux, acid-based descalents or aggressive cleaning products must not be used.
We've tested Flomasta pipe and our fittings with Fernox & Sentinel and have approved them for use with our fittings. Flomasta pipes and our fittings are also suitable with Flomasta central heating inhibitor.
We’ve approved antifreeze which is based on Ethylene Glycol mixtures only.
Please contact a registered electrical contractor or your local Electrical Authority with regards to bonding, continuity and electrical safety.
Twistloc® is suitable for use outdoors, however it should either be painted or covered with insulation to protect against exposure to UV rays.
It’s essential to carry out a full system check upon completion of an installation. Before carrying out any tests, ensure that all Twistloc® pipe and fittings are installed correctly. We recommend a test of 2 bar for 10 minutes followed by 10 bar for 10 minutes. Any products that are not manufactured by Twistloc® and are unable to withstand the test pressures should be disconnected during the test and capped off using the Twistloc® end stop cap. Pressure testing is NOT a substitute for making sure pipes and fittings are correctly installed. For details on how to make a secure join, refer to the beginning of the installation guide.